HOW TO INSTALL WINDOWS 8 ENTERPRISE
|
|||
|
Learn How To Install Windows 8 on computer desktop or laptop. This is step By step method for beginners with screenshots. You can easily install windows 8 by below steps.
Windows 8 introduced major changes to the usual operating system’s platform and user interface. It was intended to improve users’ experience with tablets and other touch screen devices.
|
||
You need to have ISO Windows 8 bootable CD/DVD or USB drive to be able to install Windows 8.
Learn how to Create Bootable Media.
If you already have bootable CD/DVD or USB drive then you can skip this part.
Before we go to Windows 8 installation, first you need to change the first boot device of your computer BIOS to be able to boot your bootable CD/DVD or USB drive.
Learn how to Change First Boot Device.
Now that were done with creating bootable media and changing first boot device, we are now ready to Windows 8 installation.

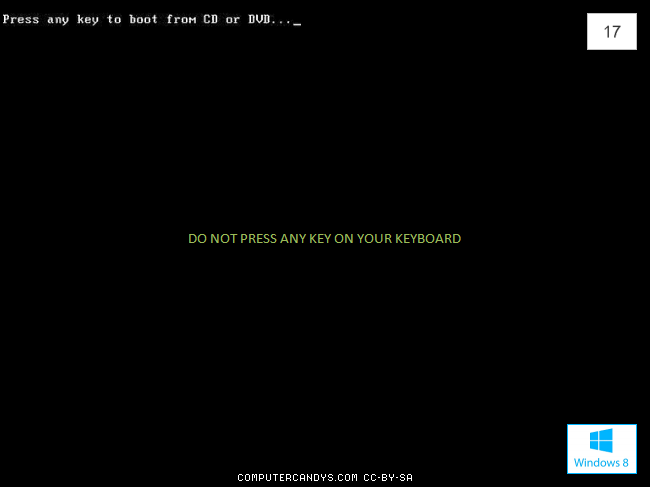
Turn ON your computer and wait to black screen to show up. When you see the "Press any key to boot from CD or DVD..." simply press any key on your keyboard.
Note: If you dont press any key it will boot direct to your current OS. If this happens, simply reboot and try to boot to the CD or USB drive again.

Read: You don't need to do anything at this point but wait for Windows 8 to finishing loading files in preparation for the setup process.
Note: No changes are being made to your computer at this time. Windows 8 is just temporarily "loading files" into memory for the setup process.

Choose the Language to install, Time and currency format, and Keyboard or input method that you'd like to use in your new Windows 8 installation.

Read: This will officially begin the Windows 8 clean install process.
Note: The Repair your computer link is used to start a Windows 8 Startup Repair or perform another recovery or repair task from System Recovery Options.

The Windows 8 setup process is now beginning. No need to press any keys here, everything is automatic.

Enter the product key that came with your retail purchase or legal download of Windows 8. If Windows 8 came as part of your complete computer system, Enter the product key you were given as part of that purchase.
Note: If Windows originally came preinstalled on your computer, your product key is probably located on a sticker attached to the side, back, or bottom of your computer's case.
Important: Entering your product key at this point in the Windows 8 clean install process is required. This is unlike in previous versions of Windows where you could skip the product key entry during installation as long as you provided one within a certain time frame, usually 30 or 60 days. Also unlike in previous versions, activating your Windows 8 product key online is automatic and part of this process.

Note: Read through the agreement, check the I accept the license terms checkbox under the agreement text, and then Click Next to confirm that you agree with the terms.
Important: You are not breaking any laws or contracts by reinstalling Windows 8 via this clean install. As long as this particular copy of Windows 8 is only being operated on one computer, you are OK.
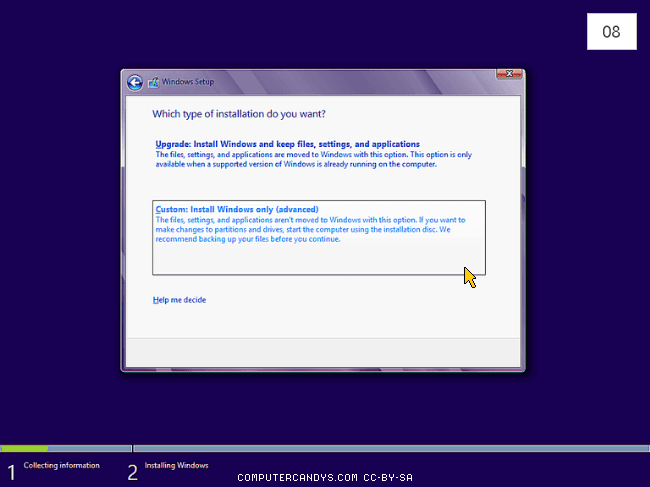
Important: Even if you are upgrading from a previous operating system to Windows 8, I highly recommend that you do not follow the Upgrade installation. You'll get better performance with less chance of issues if you follow these clean install steps.

Important: If you have a new or otherwise empty hard drive and you were installing Windows 8, you will not see this! Skip this and go to Step 14 instead.
Note: Windows 8 setup considers partition management as an advanced task, so you'll need to Click the Drive options (advanced) link to make those options available.

Now that all available drive options are listed, you can delete any operating system related partitions from your existing hard drives. Highlight the partition you want to delete and then Click the Delete link.

Warning: This will remove all of the information on that partition. Everything on that drive will be deleted during this process.

Note: If there are any other partitions that need to be deleted, you can do so at this time. Highlight the partition and Click the Delete link.
Note: As you can see, the partition we deleted in the last step is gone. It may appear like it's still there but if you look closely, you'll see that that same 59.7 GB space is now described as Unallocated Space, not as a partition.

Warning: This will remove all of the information on that partition. Everything on that drive will be deleted during this process.

Read: As you can now see, all the space on the installed hard drive is unallocated. No partitions exist on this computer. Now Choose the appropriate unallocated space to install Windows 8 on and then Click Next.
Note: You do not need to manually create a new partition nor are you required to manually format a new partition. Windows 8 Setup will do this automatically.

Read: Windows 8 will now begin installing. No user intervention is necessary. Everything is automatic.
Note: Depending on the speed of your computer, this process could take anywhere from 5 to 30 minutes.

Note: When your computer restarts, Setup will continue.
Do not press any key on your keyboard! This time you will just let the computer boot up to continue by doing nothing.

Please wait while Windows 8 is loading. This usually only takes a minutes.

In the background, Windows 8 is identifying all of the hardware that makes up your computer and installing the appropriate drivers for those devices, if available.
This process usually takes just a few minutes and you may see your screen flicker and go blank from time to time.

Note: Your PC will automatically restart again.
Important: Do not restart your computer manually at this point. Windows 8 Setup will restart your PC for you. If you interrupt the setup process by restarting manually, the clean install process may fail. You may then need to start the Windows 8 setup over again from the beginning.

Do not press any key on your keyboard! And again just let the computer boot up to continue by doing nothing.

Please wait while Windows 8 is loading. This usually only takes a minutes.

Four sections are shown, including Personalize, Wireless, Settings, and Sign in. This screen only appears for a few seconds before automatically progressing to Personalize.

The color you choose helps shape the display on your future Windows 8 Start Screen, and in some other areas of Windows 8.
The PC name is just a friendly phrase for hostname, the name that identifies this computer on your network.

On the Settings screen, you have the option of accepting Microsoft's recommended default settings for Windows 8, which are detailed on screen, or customizing them to your preferences. Click Use express settings or customizing them to continue.

If you don't have any microsoft account just Click the "Skip this step" link to proceed.
If you already have an email associated with a major Microsoft service then you can use that here. If you don't, that's OK, Enter any email address and Microsoft will create an account for you based on that email address.
The advantage of using a Microsoft account is that you can easily use the Windows Store, you can sync major settings between multiple Windows 8 computers, and more.

You need to create an account for you to signing in. There are two options for signing in: Microsoft account or Local account. Choose one to proceed.

In the User name: text box, Enter a name you'd like to use and how you'd like your computer to be identified.
In the Type a password: text box, Enter a complicated but easy-for-you-to-remember password. Retype the same password in the Retype your password: text box.
In the Type a password hint: text box, Enter a hint related to your password to you to remember. This hint will display if you Enter the wrong password when logging on to Windows 8.
Tips: You can write your password in a piece of paper so when you forgot your password you can still be able to remember it from a piece of paper.
Note: Planning on having more than one user on your computer? Don't worry - you can set up more users inside Windows 8 later.

SkyDrive or OneDrive is Microsoft's online storage service and is integrated into Windows 8, making it easy to keep your settings and saved files like documents, photos, and music, securely backed up and available from other devices.
Note: You'll only see this SkyDrive settings page if you are installing from Windows 8.1 or newer media. Some later installations may refer to this as its newer brand, OneDrive.

Even though you may have chosen to create, or use your current, Microsoft account, there is still a local account created to help facilitate that. This is what Windows 8 is doing while the Creating your account or Setting up your account message is on screen.

Windows 8 is now finalizing all of those personalization and other settings you just made.

Please wait while Windows 8 is loading. Soon you will be able to see the Start Screen.

Congratulations! You successfully installed Windows 8.